반응형
i123u 티스토리 블로그가 리뉴얼 합니다!
일시 : 2024년 05월 22일 오후 7시 ~ 7시 20분
반응형
i123u 티스토리 블로그가 리뉴얼 합니다!
일시 : 2024년 05월 22일 오후 7시 ~ 7시 20분
벌써 windows 10의 서비스 종료일이 1년 남았습니다(2024-04월 기준)
그래서 windows 11로 업그레이드하려는 분이 많으신 것 같은데, 이번 windows 11은 작업표시줄 위치가 가운데여서 많은 분들이 불편을 겪고 있습니다.
오늘은 작업표시줄을 왼쪽으로 바꾸는 법을 알려드리겠습니다.
먼저 작업표시줄에 마우스를 대고 오른쪽 버튼(키)를 누릅니다.
그다음 및에 (바퀴 모양) "작업 표시줄 설정"을 누릅니다.
세 번째 설정 앱이 켜지면 및에 있는 작업 표시줄 동작을 누릅니다.(클릭합니다)
그러면 및에 작업 표시줄 맟춤이 나옵니다.
그곳에 있는 가은데를 왼쪽으로 바꿉니다.
그러면 작업 표시줄이 왼쪽으로 바뀝니다(정렬됩니다)
기상청 전국 날씨 정보(RSS) 페이지를 못 찾으시는 분들을 위해 이 글을 작성합니다.
아래 페이지로 들어가 주세요.
[(구) 날씨누리 서비스 종료]
들어가기 <== 옆 택스트를 눌러주세요.
먼저 시도를 선택한 후 꼭 선택을 눌러주세요.
이와 같이 한 후 3시간/1시간 RSS를 클릭하면 창이 뜹니다. Ctrl+C를 눌러 복사한 후 확인을 눌러주세요.
먼저 아래 모듈을 설치해 주세요.
bs4 / BeautifulSoup
다음 이 글을 써주세요.
from urllib import request
from bs4 import BeautifulSoup

urlf = request.urlopen("링크")
# 위에 있는 링크는 RSS링크를 붙어넣기해주세요.

soup = BeautifulSoup(urlf, "html.parser")


for location in soup.select("location"):
    print("도시:", location.select_one("city").string)
    print("날씨:", location.select_one("wf").string)
    print("최저기온:", location.select_one("tmn").string)
    print("최고기온:", location.select_one("tmx").string)
    print()
먼저 비쥬얼 박스 환경 설정에 들어가 주세요.
[파일(F) -> 환경 설정(P) {Ctrl+G}
나오는 창에서 입력을 눌러주세요.
[[아 그리고 저가 Windows 10 -> WIndows 11으로 바꿨어요!]]

그 다음 가상 머신을 눌러주세요!

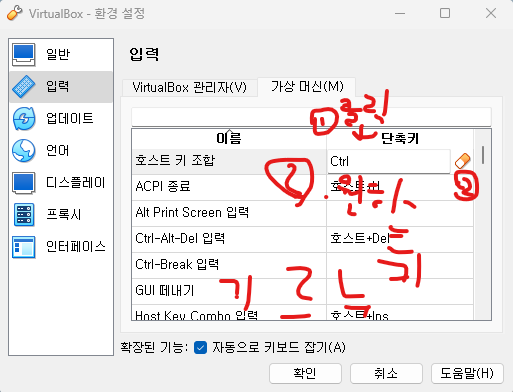
저 글씨체가 이해가 안되는 분들은 이 글을 보세요.
( 1번 : 호스트 키 조합 오른쪽에 있는 단축키 및에 있는 텍스트 클릭 / 2번 : 오른쪽에 있는 지우개 버튼 클릭 / 3번 원하는 키를 텍스트 상자 안에 누르기 )
이제 확인을 누르시고 끄시면 됩니다.
긴 포스팅 이 끝났습니다.
1. 피 닳는 스크립트
local Debounce = false

script.Parent.Touched:connect(function(hit)

	if hit.Parent:FindFirstChild("Humanoid")and Debounce == false then

		Debounce = true

		hit.Parent.Humanoid:TakeDamage(이 글자는 지워 주시고 피 닳는 수만큼 (1~99까지 써주세요.))

		wait()

		Debounce = false

	end

end)
2. 자동으로 시간이 바뀝니다. (60초 후에 1시간이 바뀝니다.)
local timeControl = game.Lighting
local timeVal = 12

while true do
    timeControl.ClockTime = timeVal
    wait(60)
    timeVal = timeVal + 1

    if timeVal == 25 then
        timeVal = 0
    end

end
3. 말하는 스크립트 (한 대사)
local ChatService = game:GetService("Chat")
local npc = script.Parent

local head = npc.Head
local click = npc.ClickDetector

local dialogue= {}

local function speak()
    local dialogue = "안녕하세요? 반갑습니다. ^^" --여기에 대사를 씁니다.
    ChatService:Chat(head, dialogue)
end

click.MouseClick:Connect(speak)
여기에는 모델 이름을 npc로 하고 ClickDetector를 추가해주세요.
4. 말하는 스크립트 (여러 번 말하기)
local ChatService = game:GetService("Chat")
local npc = script.Parent

local head = npc.Head
local click = npc.ClickDetector

local dialogue = {"안녕하세요? 반갑습니다.^^", "아아 테스트", "블로그 i123u", "https://i123u.tistory.com"}
local index = 1

local function speak()
    local talk = dialogue[index]
    ChatService:Chat(head, talk)

    if index == #dialogue then
        index = 1
    else
        index = index + 1
    end
end

click.MouseClick:Connect(speak) -- ClickDetector가 마우스 클릭을 감지하면 speak함수 실행
여기도 모델 이름을 npc로 하고 ClickDetector를 추가해 주세요.
5. 텔레포트
local teleportPart = script.Parent --Teleport Part 변수에 담기

-- teleport 함수 : 플레이어 캐릭터를 순간이동하는 함수
local function teleport(otherPart)

    local character = otherPart.Parent
    local humanoid = character:FindFirstChildOfClass("Humanoid")

    local destination = game.Workspace.Destination
    destination.Anchored = true
    destination.CanCollide = false
    destination.Transparency = 1

    if humanoid  then
        humanoid.RootPart.CFrame = CFrame.new(destination.Position)
    end
end

teleportPart.Touched:Connect(teleport)
Teleport파트에서 Destination으로 텔레포트합니다 파트이름이 다르면 작동이 불가능합니다.
로블록스.txt(?)
이 파일은 lia 사용법입니다.
이렇게 로블록스 스크립트를 알아보았습니다.
https://github.com/gqrfs/roblox-script
GitHub - gqrfs/roblox-script
Contribute to gqrfs/roblox-script development by creating an account on GitHub.
github.com
로블록스 스크립트 lua